Up to date
This page is up to date for Godot 4.2.
If you still find outdated information, please open an issue.
La scène principale du jeu
Il est maintenant temps de transformer tout ce que nous avons fait ensemble en une scène de jeu jouable.
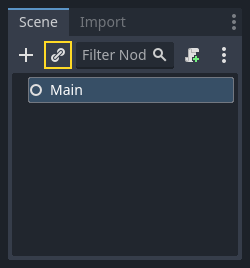
Créez une nouvelle scène et ajoutez un noeud Node nommé Main. (Nous utilisons Node au lieu Node2D est que nous l'utiliserons comme contenant pour gérer la logique du jeu qui ne nécessite pas de gestion 2D en soit.)
Click the Instance button (represented by a chain link icon) and select your saved
player.tscn.
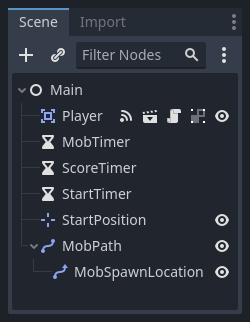
Ajoutez maintenant les nœuds suivants en tant qu'enfants de Main, et nommez-les comme indiqué (les valeurs sont en secondes) :
Timer (nommé
MobTimer) - pour contrôler à quelle fréquence les ennemis apparaissentTimer (nommé
ScoreTimer) - pour incrémenter le score à chaque secondeTimer (nommé
StartTimer) - pour ajouter un délai avant le débutMarker2D (named
StartPosition) - to indicate the player's start position
Réglez la propriété Wait Time de chacun des nœuds Timer comme suit :
MobTimer:0.5ScoreTimer:1StartTimer:2
En outre, mettez la propriété One Shot de StartTimer sur "On" et réglez la Position du nœud StartPosition sur (240, 450).
Générer des monstres
Le nœud principal va générer de nouveaux monstres, et nous voulons qu'ils apparaissent à un endroit aléatoire sur le bord de l'écran. Ajouter un nœud Path2D nommé MobPath comme un enfant de Main. Lorsque vous sélectionnez Path2D, vous verrez de nouveaux boutons en haut de l'éditeur :

Select the middle one ("Add Point") and draw the path by clicking to add the points at the corners shown. To have the points snap to the grid, make sure "Use Grid Snap" and "Use Smart Snap" are both selected. These options can be found to the left of the "Lock" button, appearing as a magnet next to some dots and intersecting lines, respectively.

Important
Tracez le chemin dans le sens des aiguilles d'une montre, ou vos monstres pointeront vers l'extérieur au lieu de vers l'intérieur !
Après avoir placé le point 4 dans l'image, cliquez sur le bouton "Fermer la courbe" et votre courbe sera terminée.
Maintenant que le chemin est défini, ajoutez un nœud PathFollow2D en tant qu'enfant de MobPath et nommez-le MobSpawnLocation. Ce nœud tournera automatiquement et suivra le chemin au fur et à mesure qu'il se déplace, de sorte que nous pouvons l'utiliser pour sélectionner une position et une direction aléatoires le long du chemin.
Votre scène devrait ressembler à ceci :
Script principal
Add a script to Main. At the top of the script, we use
@export var mob_scene: PackedScene to allow us to choose the Mob scene we want
to instance.
extends Node

@export var mob_scene: PackedScene
var score
using Godot;

public partial class Main : Node
{
    // Don't forget to rebuild the project so the editor knows about the new export variable.

    [Export]
    public PackedScene MobScene { get; set; }

    private int _score;
}
Cliquez sur le nœud Main et vous verrez la propriété Mob Scene dans l'inspecteur sous "Script Variables".
Vous pouvez affecter la valeur de cette propriété de deux façons :
Drag
mob.tscnfrom the "FileSystem" dock and drop it in the Mob Scene property.Click the down arrow next to "[empty]" and choose "Load". Select
mob.tscn.
Next, select the instance of the Player scene under Main node in the Scene dock,
and access the Node dock on the sidebar. Make sure to have the Signals tab selected
in the Node dock.
You should see a list of the signals for the Player node. Find and
double-click the hit signal in the list (or right-click it and select
"Connect..."). This will open the signal connection dialog. We want to make a
new function named game_over, which will handle what needs to happen when a
game ends. Type "game_over" in the "Receiver Method" box at the bottom of the
signal connection dialog and click "Connect". You are aiming to have the hit signal
emitted from Player and handled in the Main script. Add the following code
to the new function, as well as a new_game function that will set
everything up for a new game:
func game_over():
    $ScoreTimer.stop()
    $MobTimer.stop()

func new_game():
    score = 0
    $Player.start($StartPosition.position)
    $StartTimer.start()
public void GameOver()
{
    GetNode<Timer>("MobTimer").Stop();
    GetNode<Timer>("ScoreTimer").Stop();
}

public void NewGame()
{
    _score = 0;

    var player = GetNode<Player>("Player");
    var startPosition = GetNode<Marker2D>("StartPosition");
    player.Start(startPosition.Position);

    GetNode<Timer>("StartTimer").Start();
}
Now connect the timeout() signal of each of the Timer nodes (StartTimer,
ScoreTimer, and MobTimer) to the main script. StartTimer will start
the other two timers. ScoreTimer will increment the score by 1.
func _on_score_timer_timeout():
    score += 1

func _on_start_timer_timeout():
    $MobTimer.start()
    $ScoreTimer.start()
private void OnScoreTimerTimeout()
{
    _score++;
}

private void OnStartTimerTimeout()
{
    GetNode<Timer>("MobTimer").Start();
    GetNode<Timer>("ScoreTimer").Start();
}
In _on_mob_timer_timeout(), we will create a mob instance, pick a random
starting location along the Path2D, and set the mob in motion. The
PathFollow2D node will automatically rotate as it follows the path, so we
will use that to select the mob's direction as well as its position.
When we spawn a mob, we'll pick a random value between 150.0 and
250.0 for how fast each mob will move (it would be boring if they were
all moving at the same speed).
Notez qu'une nouvelle instance doit être ajoutée à la scène en utilisant add_child().
func _on_mob_timer_timeout():
    # Create a new instance of the Mob scene.
    var mob = mob_scene.instantiate()

    # Choose a random location on Path2D.
    var mob_spawn_location = get_node("MobPath/MobSpawnLocation")
    mob_spawn_location.progress_ratio = randf()

    # Set the mob's direction perpendicular to the path direction.
    var direction = mob_spawn_location.rotation + PI / 2

    # Set the mob's position to a random location.
    mob.position = mob_spawn_location.position

    # Add some randomness to the direction.
    direction += randf_range(-PI / 4, PI / 4)
    mob.rotation = direction

    # Choose the velocity for the mob.
    var velocity = Vector2(randf_range(150.0, 250.0), 0.0)
    mob.linear_velocity = velocity.rotated(direction)

    # Spawn the mob by adding it to the Main scene.
    add_child(mob)
private void OnMobTimerTimeout()
{
    // Note: Normally it is best to use explicit types rather than the `var`
    // keyword. However, var is acceptable to use here because the types are
    // obviously Mob and PathFollow2D, since they appear later on the line.

    // Create a new instance of the Mob scene.
    Mob mob = MobScene.Instantiate<Mob>();

    // Choose a random location on Path2D.
    var mobSpawnLocation = GetNode<PathFollow2D>("MobPath/MobSpawnLocation");
    mobSpawnLocation.ProgressRatio = GD.Randf();

    // Set the mob's direction perpendicular to the path direction.
    float direction = mobSpawnLocation.Rotation + Mathf.Pi / 2;

    // Set the mob's position to a random location.
    mob.Position = mobSpawnLocation.Position;

    // Add some randomness to the direction.
    direction += (float)GD.RandRange(-Mathf.Pi / 4, Mathf.Pi / 4);
    mob.Rotation = direction;

    // Choose the velocity.
    var velocity = new Vector2((float)GD.RandRange(150.0, 250.0), 0);
    mob.LinearVelocity = velocity.Rotated(direction);

    // Spawn the mob by adding it to the Main scene.
    AddChild(mob);
}
Important
Why PI? In functions requiring angles, Godot uses radians,
not degrees. Pi represents a half turn in radians, about
3.1415 (there is also TAU which is equal to 2 * PI).
If you're more comfortable working with degrees, you'll need to
use the deg_to_rad() and rad_to_deg() functions to
convert between the two.
Tester la scène
Testons la scène pour nous assurer que tout fonctionne. Ajoutez cet appel new_game à _ready() :
func _ready():
    new_game()
public override void _Ready()
{
    NewGame();
}
Let's also assign Main as our "Main Scene" - the one that runs automatically
when the game launches. Press the "Play" button and select main.tscn when
prompted.
Astuce
If you had already set another scene as the "Main Scene", you can right
click main.tscn in the FileSystem dock and select "Set As Main Scene".
Vous devriez être capable de bouger le joueur, voir les monstres apparaître, et voir le joueur disparaître quand il est touché par un monstre.
Quand vous êtes sûr que tout fonctionne, supprimez l'appel à new_game() depuis _ready().
Que manque-t-il à notre jeu ? Une interface utilisateur. Dans la prochaine leçon, nous ajouterons un écran titre et afficherons le score du joueur.