Work in progress
The content of this page was not yet updated for Godot
4.2
and may be outdated. If you know how to improve this page or you can confirm
that it's up to date, feel free to open a pull request.
Стрибання і розчавлювання монстрів
In this part, we'll add the ability to jump and squash the monsters. In the next lesson, we'll make the player die when a monster hits them on the ground.
Спершу ми повинні змінити кілька налаштувань, пов'язаних з фізичними взаємодіями. Вступ до світу фізичних шарів.
Контроль фізичних взаємодій
Фізичні тіла мають доступ до двох додаткових властивостей: шарів і масок. Шари визначають, на яких фізичних шарах (шарі) знаходиться об'єкт.
Маски контролюють шари, які тіло буде слухати і виявляти. Маски впливають на виявлення зіткнень. Коли ви хочете, щоб два тіла взаємодіяли, вам потрібно принаймні одне з маскою, відповідною іншому.
Якщо ви заплуталися, не хвилюйтеся, ми побачимо три приклади за секунду.
Важливим моментом є те, що ви можете використовувати шари та маски для фільтрації взаємодій фізики, контролю продуктивності та усунення необхідності додаткових умов у вашому коді.
By default, all physics bodies and areas are set to both layer and mask 1.
This means they all collide with each other.
Шари фізики представлені числами, але ми можемо дати їм імена, щоб відстежувати їх вміст.
Встановлення назв шарів
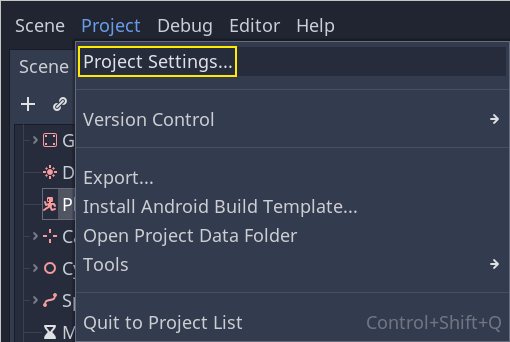
Давайте дамо нашим фізичним шарам назву. Перейдіть до Проект -> Параметри проекту.
У лівому меню перейдіть до розділу Layer Names -> 3D Physics. Праворуч ви можете побачити список шарів з полем поруч з кожним з них. В цьому полі ви можете встановити їхні імена. Назвіть перші три шари player, enemies, і world відповідно.
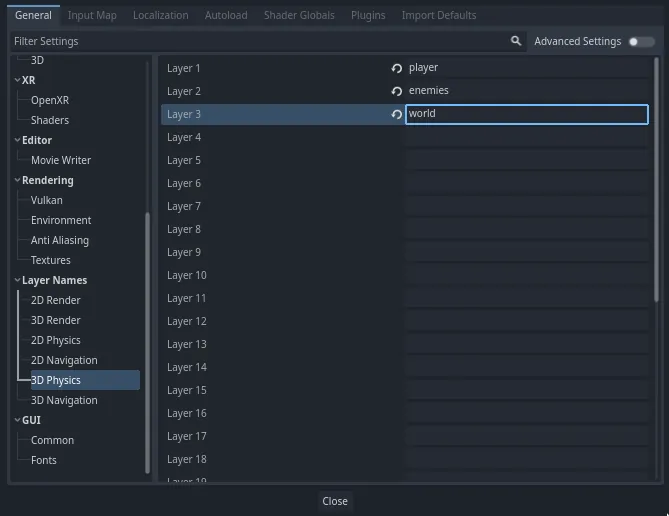
Тепер ми можемо призначити їх нашим фізичним вузлам.
Призначення шарів і масок
In the Main scene, select the Ground node. In the Inspector, expand the
Collision section. There, you can see the node's layers and masks as a grid of
buttons.
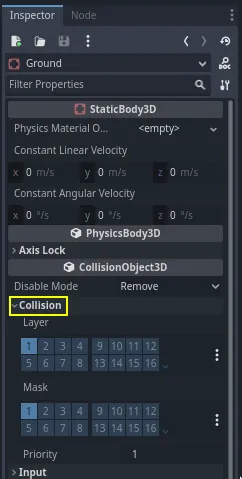
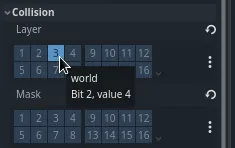
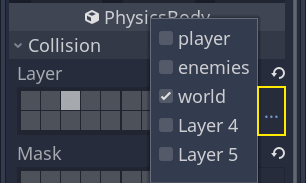
The ground is part of the world, so we want it to be part of the third layer. Click the lit button to toggle off the first Layer and toggle on the third one. Then, toggle off the Mask by clicking on it.
As mentioned before, the Mask property allows a node to listen to interaction
with other physics objects, but we don't need it to have collisions. Ground doesn't need to listen to anything; it's just there to prevent
creatures from falling.
Зверніть увагу, що ви можете натиснути кнопку "..." у правій частині властивостей, щоб переглянути список іменованих галочок.
Next up are the Player and the Mob. Open player.tscn by double-clicking
the file in the FileSystem dock.
Select the Player node and set its Collision -> Mask to both "enemies" and "world". You can leave the default Layer property as it is, because the first layer is the "player" layer.

Then, open the Mob scene by double-clicking on mob.tscn and select the
Mob node.
Встановіть йому Collision -> Layer на "enemies", а маску зіткнення Collision -> Mask, залишіть порожньою.
Зображення
These settings mean the monsters will move through one another. If you want the monsters to collide with and slide against each other, turn on the "enemies" mask.
Примітка
Мобам не потрібна маска "world", тому що вони рухаються тільки на площині XZ. Ми не застосовуємо до них ніякої гравітації.
Стрибки
Сам механізм стрибка вимагає всього двох рядків коду. Відкрийте скрипт гравця Player. Нам потрібно значення, щоб контролювати силу стрибка і оновлення _physics_process(), щоб закодувати стрибок.
Після рядка, який визначає fall_acceleration, у верхній частині скрипту, додайте jump_impulse.
#...
# Vertical impulse applied to the character upon jumping in meters per second.
@export var jump_impulse = 20
// Don't forget to rebuild the project so the editor knows about the new export variable.

// ...
// Vertical impulse applied to the character upon jumping in meters per second.
[Export]
public int JumpImpulse { get; set; } = 20;
Inside _physics_process(), add the following code before the move_and_slide() codeblock.
func _physics_process(delta):
    #...

    # Jumping.
    if is_on_floor() and Input.is_action_just_pressed("jump"):
        target_velocity.y = jump_impulse

    #...
public override void _PhysicsProcess(double delta)
{
    // ...

    // Jumping.
    if (IsOnFloor() && Input.IsActionJustPressed("jump"))
    {
        _targetVelocity.Y = JumpImpulse;
    }

    // ...
}
Це все, що вам потрібно, для стрибка!
The is_on_floor() method is a tool from the CharacterBody3D class. It
returns true if the body collided with the floor in this frame. That's why
we apply gravity to the Player: so we collide with the floor instead of
floating over it like the monsters.
If the character is on the floor and the player presses "jump", we instantly give them a lot of vertical speed. In games, you really want controls to be responsive and giving instant speed boosts like these, while unrealistic, feels great.
Notice that the Y axis is positive upwards. That's unlike 2D, where the Y axis is positive downwards.
Розчавлення монстрів
Давайте додамо далі механізм розчавлення. Ми збираємося змусити персонажа відскакувати від монстрів і вбивати їх одночасно.
Нам потрібно виявити зіткнення з монстром і відрізнити їх від зіткнень з підлогою. Для цього ми можемо використовувати функцію тегування груп Godot.
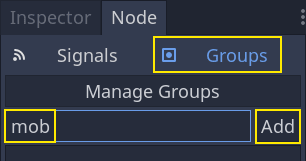
Open the scene mob.tscn again and select the Mob node. Go to the Node
dock on the right to see a list of signals. The Node dock has two tabs:
Signals, which you've already used, and Groups, which allows you to assign
tags to nodes.
Натисніть на поле введення, щоб написати ім'я тега. Введіть в поле "mob" і натисніть кнопку Додати.
У панелі Сцена з'являється значок, який вказує на те, що вузол є частиною принаймні однієї групи.
![]()
Тепер ми можемо використовувати групу в коді, щоб відрізнити зіткнення з монстрами від зіткнень з підлогою.
Кодування механізму розчавлення
Поверніться до скрипта гравця Player, щоб закодувати розчавлення.
У верхній частині скрипту нам потрібна інша властивість, bounce_impulse. Нам не потрібно, щоб при розчавленні ворога персонаж піднімався так високо, як при стрибках.
# Vertical impulse applied to the character upon bouncing over a mob in
# meters per second.
@export var bounce_impulse = 16
// Don't forget to rebuild the project so the editor knows about the new export variable.

// Vertical impulse applied to the character upon bouncing over a mob in meters per second.
[Export]
public int BounceImpulse { get; set; } = 16;
Then, after the Jumping codeblock we added above in _physics_process(), add the following loop. With
move_and_slide(), Godot makes the body move sometimes multiple times in a
row to smooth out the character's motion. So we have to loop over all collisions
that may have happened.
У кожній ітерації петлі ми перевіряємо, чи приземлилися ми на монстра. Якщо так, то ми вбиваємо його і відскакуємо.
За допомогою цього коду, якщо на даному кадрі не сталося зіткнень, цикл не буде запущений.
func _physics_process(delta):
    #...

    # Iterate through all collisions that occurred this frame
    for index in range(get_slide_collision_count()):
        # We get one of the collisions with the player
        var collision = get_slide_collision(index)

        # If the collision is with ground
        if collision.get_collider() == null:
            continue

        # If the collider is with a mob
        if collision.get_collider().is_in_group("mob"):
            var mob = collision.get_collider()
            # we check that we are hitting it from above.
            if Vector3.UP.dot(collision.get_normal()) > 0.1:
                # If so, we squash it and bounce.
                mob.squash()
                target_velocity.y = bounce_impulse
                # Prevent further duplicate calls.
                break
public override void _PhysicsProcess(double delta)
{
    // ...

    // Iterate through all collisions that occurred this frame.
    for (int index = 0; index < GetSlideCollisionCount(); index++)
    {
        // We get one of the collisions with the player.
        KinematicCollision3D collision = GetSlideCollision(index);

        // If the collision is with a mob.
        // With C# we leverage typing and pattern-matching
        // instead of checking for the group we created.
        if (collision.GetCollider() is Mob mob)
        {
            // We check that we are hitting it from above.
            if (Vector3.Up.Dot(collision.GetNormal()) > 0.1f)
            {
                // If so, we squash it and bounce.
                mob.Squash();
                _targetVelocity.Y = BounceImpulse;
                // Prevent further duplicate calls.
                break;
            }
        }
    }
}
Тут багато нових функцій. Ось ще трохи інформації про них.
The functions get_slide_collision_count() and get_slide_collision() both come from
the CharacterBody3D class and are related to
move_and_slide().
get_slide_collision() returns a
KinematicCollision3D object that holds
information about where and how the collision occurred. For example, we use its
get_collider property to check if we collided with a "mob" by calling
is_in_group() on it: collision.get_collider().is_in_group("mob").
Примітка
Метод is_in_group() доступний на кожному вузлі.
To check that we are landing on the monster, we use the vector dot product:
Vector3.UP.dot(collision.get_normal()) > 0.1. The collision normal is a 3D vector
that is perpendicular to the plane where the collision occurred. The dot product
allows us to compare it to the up direction.
З точковими добутками, коли результат більший 0, два вектори знаходяться під кутом менше 90 градусів. Вище 0.1 говорить нам, що ми приблизно вище монстра.
After handling the squash and bounce logic, we terminate the loop early via the break statement
to prevent further duplicate calls to mob.squash(), which may otherwise result in unintended bugs
such as counting the score multiple times for one kill.
We are calling one undefined function, mob.squash(), so we have to add it to
the Mob class.
Відкрийте скрипт Mob.gd, двічі клацнувши по ньому на панелі Файлова система. У верхній частині скрипту ми хочемо визначити новий сигнал з назвою squashed. А внизу можна додати функцію розчавлення, де ми випромінюємо сигнал і руйнуємо монстра.
# Emitted when the player jumped on the mob.
signal squashed

# ...


func squash():
    squashed.emit()
    queue_free()
// Don't forget to rebuild the project so the editor knows about the new signal.

// Emitted when the player jumped on the mob.
[Signal]
public delegate void SquashedEventHandler();

// ...

public void Squash()
{
    EmitSignal(SignalName.Squashed);
    QueueFree();
}
Примітка
When using C#, Godot will create the appropriate events automatically for all Signals ending with EventHandler, see C# Signals.
Ми будемо використовувати сигнал, щоб додати бали до рахунку на наступному уроці.
With that, you should be able to kill monsters by jumping on them. You can press
F5 to try the game and set main.tscn as your project's main scene.
Однак гравець безсмертний. Ми поправимо це у наступній частині.