Work in progress
The content of this page was not yet updated for Godot
4.2
and may be outdated. If you know how to improve this page or you can confirm
that it's up to date, feel free to open a pull request.
Анімація персонажа
В цьому останньому уроці ми будемо використовувати вбудовані в Godot інструменти анімації, щоб наші персонажі плавали і підстрибували. Ви навчитеся розробляти анімацію в редакторі та використовувати код, щоб ваша гра виглядала живою.
Почнемо з вступу до використання редактора анімації.
Використання редактора анімації
Рушій поставляється з інструментами для створення анімації в редакторі. Потім ви можете використовувати код для відтворення та керування нею під час виконання.
Відкрийте сцену гравця, виберіть вузол Player і додайте вузол AnimationPlayer.
Внизу з'явиться панель Анімація.
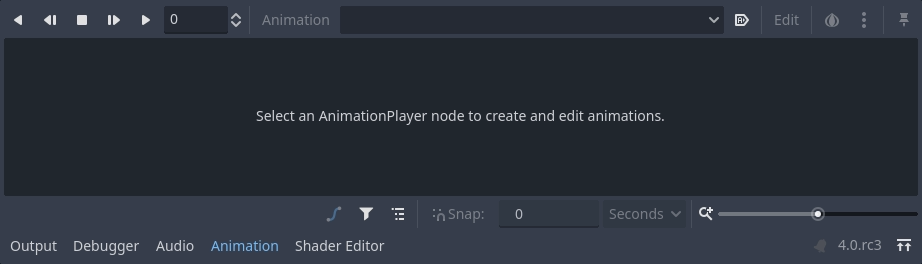
Вона містить панель інструментів і спливаюче меню анімації вгорі, редактор композицій посередині, який наразі порожній, а також параметри фільтрування, прив'язки та масштабування внизу.
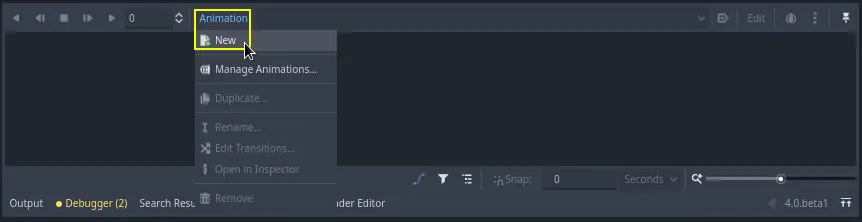
Давайте створимо анімацію. Натисніть Анімація -> Новий.
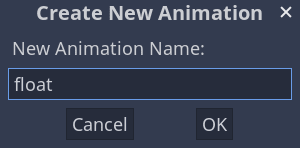
Назвіть анімацію "float".
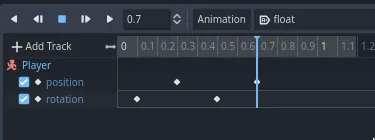
Після створення анімації з'являється часова шкала з цифрами, що позначають час у секундах.

Ми хочемо, щоб анімація почала відтворюватися автоматично на початку гри. Крім того, вона має бути зациклена.
Для цього можна натиснути кнопку з іконкою "A+" на панелі інструментів анімації і кнопку зі стрілками.
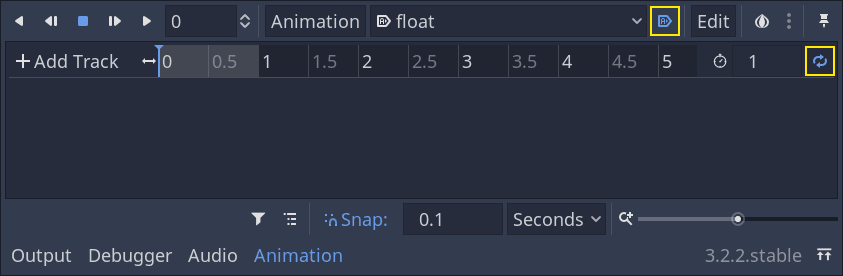
Ви також можете закріпити редактор анімації, натиснувши значок шпильки у верхньому правому куті. Це запобігає його складанню, коли ви натискаєте на вікно перегляду і знімаєте виділення з вузлів.
Зображення
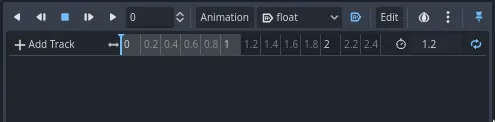
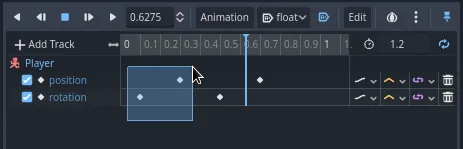
Установіть тривалість анімації на 1.2 секунди у верхньому правому куті панелі.

Ви повинні побачити, що сіра полоса трохи розширилася. Вона показує вам початок і кінець вашої анімації, а вертикальна синя позначка - ваш курсор часу.
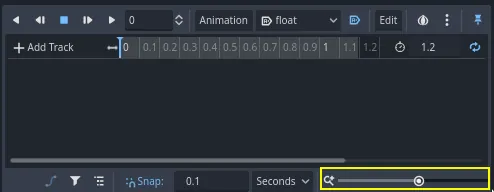
Ви можете клацнути та перетягнути повзунок у нижньому правому куті, щоб збільшити та зменшити часову шкалу.
Анімація плавання
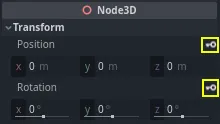
За допомогою вузла AnimationPlayer ви можете анімувати більшість властивостей на всіх вузлах, для яких це потрібно. Турайте на значок ключа поруч із властивостями в інспекторі. Ви можете клацнути будь-який з них, щоб створити ключовий кадр, пару з часу та значень для відповідної властивості. Ключовий кадр вставляється там, де курсор часу знаходиться на часовій шкалі.
Вставимо наші перші клавіші. Тут ми анімуватимемо як положення, так і обертання вузла Символ.
Виберіть Символ, а потім клацніть значок ключа поруч із Переклад в інспекторі. Зробіть те саме для ступенів обертання.
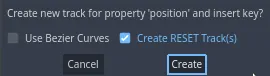
For this tutorial, just create RESET Track(s) which is the default choice
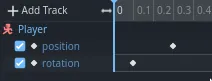
У редакторі з'являться дві доріжки зі значком ромбика, що представляє кожен ключовий кадр.

Ви можете клацнути і перетягнути діаманти, щоб перемістити їх у часі. Перемістіть клавішу положення на 0.3 секунди, а клавішу обертання на 0.1 секунди.
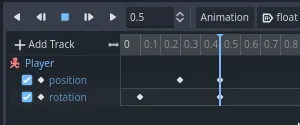
Move the time cursor to 0.5 seconds by clicking and dragging on the gray
timeline.

В Інспекторі встановіть для осі Position (Позиція) значення 0.65 метрів, а для осі Rotation (Обертання) - 8.
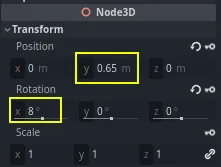
Створіть ключовий кадр для обох властивостей
Тепер перемістіть позиційний ключовий кадр на 0,7 секунди, перетягнувши його на шкалі часу.
Примітка
Лекція про принципи анімації виходить за рамки цього посібника. Просто завбачте, що ви не хочете, щоб час і простір були рівномірними. Замість цього аніматори грають з таймінгом і інтервалом, двома основними принципами анімації. Ви хочете компенсувати і контрастувати в русі вашого персонажа, щоб змусити його виглядати живими.
Перемістіть курсор часу в кінець анімації, на 1.2 секунду. Встановіть позицію Y приблизно на 0.35, а поворот X на -9 градусів. Знову створіть ключ для обох властивостей.

Ви можете переглянути результат, натиснувши кнопку відтворення або клавіші Shift + D. Натисніть кнопку зупинки або S, щоб зупинити відтворення.

Ви можете бачити, що рушій інтерполює між вашими ключовими кадрами, щоб створити безперервну анімацію. На даний момент, однак, рух виглядає дуже роботизованим. Це пояснюється тим, що інтерполяція за замовчуванням є лінійною, викликаючи постійні переходи, на відміну від руху живих істот в реальному світі.
Ми можемо контролювати перехід між ключовими кадрами за допомогою кривих пом'якшення.
Клацніть і обведіть перші два ключа на часовій шкалі, щоб вибрати їх.
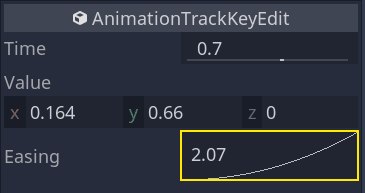
Властивості обох ключів можна редагувати одночасно в Інспекторі, де можна побачити властивість Easing.
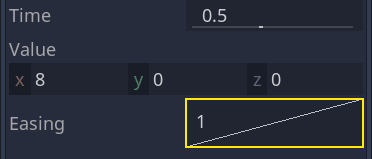
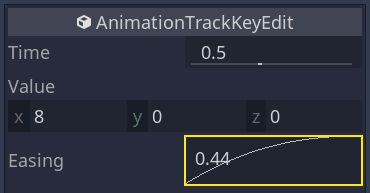
Клацніть і потягніть криву вліво. Це зробить анімацію легкою, тобто переміщення буде спочатку прискорюватися, а потім сповільнюватися, по мірі наближення курсора часу до наступного ключового кадру.

Відтворіть анімацію ще раз, щоб побачити різницю. У першій половині стрибок вже повинен виглядати краще.
Застосуйте пом'якшення до другого ключового кадру на треку обертання.
Зробіть протилежне для другого позиційного ключового кадру, перетягнувши його праворуч.
Анімація повинна виглядати приблизно так.
Примітка
Анімація оновлює властивості анімованих вузлів кожного кадру, перевизначаючи початкові значення. Якби ми анімували безпосередньо вузол Player, це завадило б нам переміщати його в коді. Ось де вузол Pivot стає в нагоді: незважаючи на те, що ми анімували Character, ми все ще можемо переміщати та обертати Pivot вверх з анімацією у скрипті.
Якщо ви запустите гру персонаж гравця тепер буде плавати!
Якщо істота знаходиться занадто близько до підлоги, ви можете перемістити Pivot вгору, щоб змістити її.
Керування анімацією в коді
Ми можемо використовувати код для управління відтворенням анімації на основі введення гравця. Давайте змінимо швидкість анімації, коли персонаж рухається.
Відкрийте скрипт Плеєр, натиснувши на іконку скрипта поруч з ним.
![]()
В _physics_process(), після рядка, де ми перевіряємо direction вектор, додайте наступний код.
func _physics_process(delta):
    #...
    if direction != Vector3.ZERO:
        #...
        $AnimationPlayer.speed_scale = 4
    else:
        $AnimationPlayer.speed_scale = 1
public override void _PhysicsProcess(double delta)
{
    // ...
    if (direction != Vector3.Zero)
    {
        // ...
        GetNode<AnimationPlayer>("AnimationPlayer").SpeedScale = 4;
    }
    else
    {
        GetNode<AnimationPlayer>("AnimationPlayer").SpeedScale = 1;
    }
}
Цей код працює таким чином, що коли гравець рухається, ми множимо швидкість відтворення на 4. Коли він зупиняється, оновлюємо її до нормального стану.
Ми згадували, що Pivot може накладати трансформації поверх анімації. Ми можемо зробити дугу символу при стрибку за допомогою наступного рядка коду. Додайте його в кінець _physics_process().
func _physics_process(delta):
    #...
    $Pivot.rotation.x = PI / 6 * velocity.y / jump_impulse
public override void _PhysicsProcess(double delta)
{
    // ...
    var pivot = GetNode<Node3D>("Pivot");
    pivot.Rotation = new Vector3(Mathf.Pi / 6.0f * Velocity.Y / JumpImpulse, pivot.Rotation.Y, pivot.Rotation.Z);
}
Анімація монстрів
Ось ще один приємний трюк з анімацією в Godot: поки ви використовуєте подібну структуру вузлів, ви можете скопіювати її на різні сцени.
Наприклад, обидві сцени Mob і Player мають вузол Pivot і вузол Character, тому ми можемо повторно використовувати анімацію між ними.
Відкрийте сцену Player, виберіть вузол AnimationPlayer і відкрийте анімацію "float". Далі натисніть Анімація > Копіювати. Потім відкрийте mob.tscn, створіть дочірній вузол AnimationPlayer і виберіть його. Натисніть Animation > Paste і переконайтеся, що в редакторі анімації на нижній панелі також увімкнені кнопка зі значком "A+" (Autoplay on Load) і стрілки, що зациклюються (Animation looping). Все, тепер усі монстри відтворюватимуть анімацію плавання.
Ми можемо змінити швидкість відтворення на основі швидкості монстра random_speed. Відкрийте скрипт Mob і в кінці функції initialize() додайте наступний рядок.
func initialize(start_position, player_position):
    #...
    $AnimationPlayer.speed_scale = random_speed / min_speed
public void Initialize(Vector3 startPosition, Vector3 playerPosition)
{
    // ...
    GetNode<AnimationPlayer>("AnimationPlayer").SpeedScale = randomSpeed / MinSpeed;
}
І на цьому ви закінчили кодування своєї першої повної 3D-гри.
Вітаю!
У наступній частині ми швидко підсумуємо те, що ви дізналися, і дамо деякі посилання для подальшого навчання. А на даний момент ви можете перевірити свій код звірившись з повними зразками Player.gd і Mob.gd.
Ось скрипт Player.
extends CharacterBody3D

signal hit

# How fast the player moves in meters per second.
@export var speed = 14
# The downward acceleration while in the air, in meters per second squared.
@export var fall_acceleration = 75
# Vertical impulse applied to the character upon jumping in meters per second.
@export var jump_impulse = 20
# Vertical impulse applied to the character upon bouncing over a mob
# in meters per second.
@export var bounce_impulse = 16

var target_velocity = Vector3.ZERO


func _physics_process(delta):
    # We create a local variable to store the input direction
    var direction = Vector3.ZERO

    # We check for each move input and update the direction accordingly
    if Input.is_action_pressed("move_right"):
        direction.x = direction.x + 1
    if Input.is_action_pressed("move_left"):
        direction.x = direction.x - 1
    if Input.is_action_pressed("move_back"):
        # Notice how we are working with the vector's x and z axes.
        # In 3D, the XZ plane is the ground plane.
        direction.z = direction.z + 1
    if Input.is_action_pressed("move_forward"):
        direction.z = direction.z - 1

    # Prevent diagonal movement being very fast
    if direction != Vector3.ZERO:
        direction = direction.normalized()
        $Pivot.look_at(position + direction,Vector3.UP)
        $AnimationPlayer.speed_scale = 4
    else:
        $AnimationPlayer.speed_scale = 1

    # Ground Velocity
    target_velocity.x = direction.x * speed
    target_velocity.z = direction.z * speed

    # Vertical Velocity
    if not is_on_floor(): # If in the air, fall towards the floor
        target_velocity.y = target_velocity.y - (fall_acceleration * delta)

    # Jumping.
    if is_on_floor() and Input.is_action_just_pressed("jump"):
        target_velocity.y = jump_impulse

    # Iterate through all collisions that occurred this frame
    # in C this would be for(int i = 0; i < collisions.Count; i++)
    for index in range(get_slide_collision_count()):
        # We get one of the collisions with the player
        var collision = get_slide_collision(index)

        # If the collision is with ground
        if collision.get_collider() == null:
            continue

        # If the collider is with a mob
        if collision.get_collider().is_in_group("mob"):
            var mob = collision.get_collider()
            # we check that we are hitting it from above.
            if Vector3.UP.dot(collision.get_normal()) > 0.1:
                # If so, we squash it and bounce.
                mob.squash()
                target_velocity.y = bounce_impulse
                # Prevent further duplicate calls.
                break

    # Moving the Character
    velocity = target_velocity
    move_and_slide()

    $Pivot.rotation.x = PI / 6 * velocity.y / jump_impulse

# And this function at the bottom.
func die():
    hit.emit()
    queue_free()

func _on_mob_detector_body_entered(body):
    die()
using Godot;

public partial class Player : CharacterBody3D
{
    // Emitted when the player was hit by a mob.
    [Signal]
    public delegate void HitEventHandler();

    // How fast the player moves in meters per second.
    [Export]
    public int Speed { get; set; } = 14;
    // The downward acceleration when in the air, in meters per second squared.
    [Export]
    public int FallAcceleration { get; set; } = 75;
    // Vertical impulse applied to the character upon jumping in meters per second.
    [Export]
    public int JumpImpulse { get; set; } = 20;
    // Vertical impulse applied to the character upon bouncing over a mob in meters per second.
    [Export]
    public int BounceImpulse { get; set; } = 16;

    private Vector3 _targetVelocity = Vector3.Zero;

    public override void _PhysicsProcess(double delta)
    {
        // We create a local variable to store the input direction.
        var direction = Vector3.Zero;

        // We check for each move input and update the direction accordingly.
        if (Input.IsActionPressed("move_right"))
        {
            direction.X += 1.0f;
        }
        if (Input.IsActionPressed("move_left"))
        {
            direction.X -= 1.0f;
        }
        if (Input.IsActionPressed("move_back"))
        {
            // Notice how we are working with the vector's X and Z axes.
            // In 3D, the XZ plane is the ground plane.
            direction.Z += 1.0f;
        }
        if (Input.IsActionPressed("move_forward"))
        {
            direction.Z -= 1.0f;
        }

        // Prevent diagonal movement being very fast.
        if (direction != Vector3.Zero)
        {
            direction = direction.Normalized();
            GetNode<Node3D>("Pivot").LookAt(Position + direction, Vector3.Up);
            GetNode<AnimationPlayer>("AnimationPlayer").PlaybackSpeed = 4;
        }
        else
        {
            GetNode<AnimationPlayer>("AnimationPlayer").PlaybackSpeed = 1;
        }

        // Ground velocity
        _targetVelocity.X = direction.X * Speed;
        _targetVelocity.Z = direction.Z * Speed;

        // Vertical velocity
        if (!IsOnFloor())
        {
            _targetVelocity.Y -= FallAcceleration * (float)delta;
        }

        // Jumping.
        if (IsOnFloor() && Input.IsActionJustPressed("jump"))
        {
            _targetVelocity.Y += JumpImpulse;
        }

        // Iterate through all collisions that occurred this frame.
        for (int index = 0; index < GetSlideCollisionCount(); index++)
        {
            // We get one of the collisions with the player.
            KinematicCollision3D collision = GetSlideCollision(index);

            // If the collision is with a mob.
            if (collision.GetCollider() is Mob mob)
            {
                // We check that we are hitting it from above.
                if (Vector3.Up.Dot(collision.GetNormal()) > 0.1f)
                {
                    // If so, we squash it and bounce.
                    mob.Squash();
                    _targetVelocity.Y = BounceImpulse;
                    // Prevent further duplicate calls.
                    break;
                }
            }
        }

        // Moving the character
        Velocity = _targetVelocity;
        MoveAndSlide();

        var pivot = GetNode<Node3D>("Pivot");
        pivot.Rotation = new Vector3(Mathf.Pi / 6.0f * Velocity.Y / JumpImpulse, pivot.Rotation.Y, pivot.Rotation.Z);
    }

    private void Die()
    {
        EmitSignal(SignalName.Hit);
        QueueFree();
    }

    private void OnMobDetectorBodyEntered(Node body)
    {
        Die();
    }
}
І скрипт Mob.
extends CharacterBody3D

# Minimum speed of the mob in meters per second.
@export var min_speed = 10
# Maximum speed of the mob in meters per second.
@export var max_speed = 18

# Emitted when the player jumped on the mob
signal squashed

func _physics_process(_delta):
    move_and_slide()

# This function will be called from the Main scene.
func initialize(start_position, player_position):
    # We position the mob by placing it at start_position
    # and rotate it towards player_position, so it looks at the player.
    look_at_from_position(start_position, player_position, Vector3.UP)
    # Rotate this mob randomly within range of -90 and +90 degrees,
    # so that it doesn't move directly towards the player.
    rotate_y(randf_range(-PI / 4, PI / 4))

    # We calculate a random speed (integer)
    var random_speed = randi_range(min_speed, max_speed)
    # We calculate a forward velocity that represents the speed.
    velocity = Vector3.FORWARD * random_speed
    # We then rotate the velocity vector based on the mob's Y rotation
    # in order to move in the direction the mob is looking.
    velocity = velocity.rotated(Vector3.UP, rotation.y)

    $AnimationPlayer.speed_scale = random_speed / min_speed

func _on_visible_on_screen_notifier_3d_screen_exited():
    queue_free()

func squash():
    squashed.emit()
    queue_free() # Destroy this node
using Godot;

public partial class Mob : CharacterBody3D
{
    // Emitted when the played jumped on the mob.
    [Signal]
    public delegate void SquashedEventHandler();

    // Minimum speed of the mob in meters per second
    [Export]
    public int MinSpeed { get; set; } = 10;
    // Maximum speed of the mob in meters per second
    [Export]
    public int MaxSpeed { get; set; } = 18;

    public override void _PhysicsProcess(double delta)
    {
        MoveAndSlide();
    }

    // This function will be called from the Main scene.
    public void Initialize(Vector3 startPosition, Vector3 playerPosition)
    {
        // We position the mob by placing it at startPosition
        // and rotate it towards playerPosition, so it looks at the player.
        LookAtFromPosition(startPosition, playerPosition, Vector3.Up);
        // Rotate this mob randomly within range of -90 and +90 degrees,
        // so that it doesn't move directly towards the player.
        RotateY((float)GD.RandRange(-Mathf.Pi / 4.0, Mathf.Pi / 4.0));

        // We calculate a random speed (integer).
        int randomSpeed = GD.RandRange(MinSpeed, MaxSpeed);
        // We calculate a forward velocity that represents the speed.
        Velocity = Vector3.Forward * randomSpeed;
        // We then rotate the velocity vector based on the mob's Y rotation
        // in order to move in the direction the mob is looking.
        Velocity = Velocity.Rotated(Vector3.Up, Rotation.Y);

        GetNode<AnimationPlayer>("AnimationPlayer").SpeedScale = randomSpeed / MinSpeed;
    }

    public void Squash()
    {
        EmitSignal(SignalName.Squashed);
        QueueFree(); // Destroy this node
    }

    private void OnVisibilityNotifierScreenExited()
    {
        QueueFree();
    }
}