Up to date
This page is up to date for Godot 4.2.
If you still find outdated information, please open an issue.
2D sprite animation
Вступ
In this tutorial, you'll learn how to create 2D animated characters with the AnimatedSprite2D class and the AnimationPlayer. Typically, when you create or download an animated character, it will come in one of two ways: as individual images or as a single sprite sheet containing all the animation's frames. Both can be animated in Godot with the AnimatedSprite2D class.
First, we'll use AnimatedSprite2D to animate a collection of individual images. Then we will animate a sprite sheet using this class. Finally, we will learn another way to animate a sprite sheet with AnimationPlayer and the Animation property of Sprite2D.
Примітка
Арт для наступних прикладів на https://opengameart.org/users/ansimuz та tgfcoder.
Individual images with AnimatedSprite2D
У цьому випадку у вас є колекція зображень, кожен з яких містить один з анімаційних кадрів вашого персонажа. Для цього прикладу ми будемо використовувати наступну анімацію:

You can download the images here: 2d_sprite_animation_assets.zip
Розпакуйте зображення та розташуйте їх у папці проекту. Налаштуйте дерево сцен за допомогою таких вузлів:
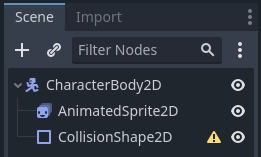
Примітка
Кореневим вузлом також може бути Area2D, або RigidBody2D. Анімація все одно буде зроблена таким же чином. Після завершення анімації можна призначити форму зіткнення CollisionShape2D. Докладніше про це можна дізнатися зі Вступу до фізики.
Now select the AnimatedSprite2D and in its SpriteFrames property, select
"New SpriteFrames".
Натисніть на новий ресурс SpriteFrames, і ви побачите, що в нижній частині вікна редактора з'явиться нова панель:
На панелі Файлова система з лівого боку перетягніть 8 окремих зображень у центральну частину панелі "Кадри Спрайта". З лівого боку змініть назву анімації з "default" на "run".
Use the "Play" buttons on the top-right of the Filter Animations input to preview the animation. You should now see the animation playing in the viewport. However, it is a bit slow. To fix this, change the Speed (FPS) setting in the SpriteFrames panel to 10.
You can add additional animations by clicking the "Add Animation" button and adding additional images.
Керування анімацією
Після завершення анімації ви можете керувати анімацією за допомогою коду користуючись методами play() та stop(). Ось короткий приклад для відтворення анімації під час утримання клавіші зі стрілкою вправо та зупинки її, коли клавіша буде випущена.
extends CharacterBody2D

@onready var _animated_sprite = $AnimatedSprite2D

func _process(_delta):
    if Input.is_action_pressed("ui_right"):
        _animated_sprite.play("run")
    else:
        _animated_sprite.stop()
using Godot;

public partial class Character : CharacterBody2D
{
    private AnimatedSprite2D _animatedSprite;

    public override void _Ready()
    {
        _animatedSprite = GetNode<AnimatedSprite>("AnimatedSprite");
    }

    public override _Process(float _delta)
    {
        if (Input.IsActionPressed("ui_right"))
        {
            _animatedSprite.Play("run");
        }
        else
        {
            _animatedSprite.Stop();
        }
    }
}
Sprite sheet with AnimatedSprite2D
You can also easily animate from a sprite sheet with the class AnimatedSprite2D.
We will use this public domain sprite sheet:
Клацніть зображення правою кнопкою миші та виберіть "Зберегти зображення як", щоб завантажити його, а потім скопіюйте зображення в папку проекту.
Set up your scene tree the same way you did previously when using individual images.
Select the AnimatedSprite2D and in its SpriteFrames property, select "New SpriteFrames".
Натисніть на новий ресурс SpriteFrames. Цього разу, коли з'явиться нижня панель, виберіть "Додати кадри з аркуша спрайтів".
Вам буде запропоновано відкрити файл. Виберіть спрайтовий аркуш.
Відкриється нове вікно, на якому буде показано ваш спрайтовий лист. Перше, що вам потрібно буде зробити, це змінити кількість вертикальних і горизонтальних зображень у вашому спрайтовому аркуші. На цьому аркуші спрайтів ми маємо чотири зображення горизонтально та два вертикально.
Далі виділіть кадри з спрайтового аркуша, які потрібно включити в анімацію. Ми виберемо четвірку кращих, а потім натиснемо "Додати 4 кадри", щоб створити анімацію.
Тепер ви побачите свою анімацію під списком анімацій на нижній панелі. Двічі клацніть default, щоб змінити назву анімації на jump.
Finally, check the play button on the SpriteFrames editor to see your frog jump!
Спрайтовий аркуш з AnimationPlayer
Another way that you can animate when using a sprite sheet is to use a standard Sprite2D node to display the texture, and then animating the change from texture to texture with AnimationPlayer.
Розглянемо цей спрайтовий аркуш, який містить 6 кадрів анімації:

Клацніть зображення правою кнопкою мишки та виберіть "Зберегти зображення як", щоб завантажити, а потім скопіюйте зображення в папку проекту.
Наша мета полягає в тому, щоб відображати ці зображення один за одним в циклі. Почніть з налаштування вашого дерева сцени:
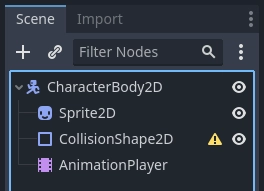
Примітка
Кореневим вузлом також може бути Area2D, або RigidBody2D. Анімація все одно буде зроблена таким же чином. Після завершення анімації можна призначити форму зіткнення CollisionShape2D. Докладніше про це можна дізнатися зі Вступу до фізики.
Перетягніть спрайтовий аркуш у властивість спрайта Sprite Texture, і ви побачите весь аркуш на екрані. Щоб розділити його на окремі кадри, розгорніть розділ Animation в Інспекторі та встановіть в Hframes значення 6. Hframes і Vframes - це кількість горизонтальних і вертикальних кадрів у вашому спрайтовому аркуші.
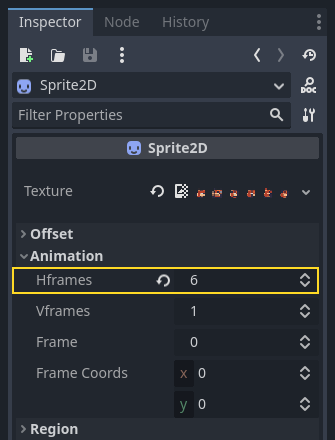
Now try changing the value of the Frame property. You'll see that it ranges
from 0 to 5 and the image displayed by the Sprite2D changes accordingly.
This is the property we'll be animating.
Виберіть AnimationPlayer і натисніть кнопку "Animation", а потім "New". Назвіть нову анімацію "walk". Встановіть довжину анімації 0.6 та натисніть значок зациклення, щоб наша анімація повторювалася.

Now select the Sprite2D node and click the key icon to add a new track.

Продовжуйте додавати кадри в кожній точці часової шкали (0.1 секунди за замовчуванням), поки у вас не будуть всі кадри від 0 до 5. Ви побачите кадри, які насправді з'являються в анімаційній доріжці:
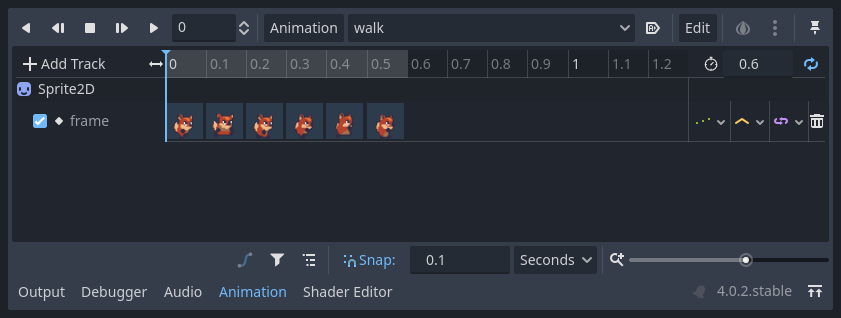
Натисніть "Відтворити" на анімації, щоб побачити, як вона виглядає.
Керування анімацією AnimationPlayer
Like with AnimatedSprite2D, you can control the animation via code using
the play() and stop() methods. Again, here is an example to play the
animation while the right arrow key is held, and stop it when the key is
released.
extends CharacterBody2D

@onready var _animation_player = $AnimationPlayer

func _process(_delta):
    if Input.is_action_pressed("ui_right"):
        _animation_player.play("walk")
    else:
        _animation_player.stop()
using Godot;

public partial class Character : CharacterBody2D
{
    private AnimationPlayer _animationPlayer;

    public override void _Ready()
    {
        _animationPlayer = GetNode<AnimationPlayer>("AnimationPlayer");
    }

    public override void _Process(float _delta)
    {
        if (Input.IsActionPressed("ui_right"))
        {
            _animationPlayer.Play("walk");
        }
        else
        {
            _animationPlayer.Stop();
        }
    }
}
Примітка
Якщо оновлювати одночасно анімації і окрему властивість (наприклад, платформер може оновити властивості спрайта h_flip/v_flip, коли персонаж повертається під час запуску анімації "повороту"), важливо мати на увазі, що play() не застосовується миттєво. Застосування відбувається під час наступної обробки AnimationPlayer. І може, в кінцевому підсумку, опинитися на наступному кадрі, викликаючи "збій" кадра, де була застосована зміна властивості, але анімація не відбулася. Якщо це виявиться проблемою, після виклику play() можна відразу викликати advance(0), щоб оновити анімацію.
Підсумок
These examples illustrate the two classes you can use in Godot for 2D animation.
AnimationPlayer is a bit more complex than AnimatedSprite2D,
but it provides additional functionality, since you can also
animate other properties like position or scale.
The class AnimationPlayer can also be used with an AnimatedSprite2D.
Experiment to see what works best for your needs.