Attention: Here be dragons
This is the latest
(unstable) version of this documentation, which may document features
not available in or compatible with released stable versions of Godot.
Checking the stable version of the documentation...
Using 3D transforms
Introduction
If you have never made 3D games before, working with rotations in three dimensions can be confusing at first. Coming from 2D, the natural way of thinking is along the lines of "Oh, it's just like rotating in 2D, except now rotations happen in X, Y and Z".
At first, this seems easy. For simple games, this way of thinking may even be enough. Unfortunately, it's often incorrect.
Angles in three dimensions are most commonly referred to as "Euler Angles".
Euler angles were introduced by mathematician Leonhard Euler in the early 1700s.

This way of representing 3D rotations was groundbreaking at the time, but it has several shortcomings when used in game development (which is to be expected from a guy with a funny hat). The idea of this document is to explain why, as well as outlining best practices for dealing with transforms when programming 3D games.
Problems of Euler angles
While it may seem intuitive that each axis has a rotation, the truth is that it's just not practical.
Axis order
The main reason for this is that there isn't a unique way to construct an orientation from the angles. There isn't a standard mathematical function that takes all the angles together and produces an actual 3D rotation. The only way an orientation can be produced from angles is to rotate the object angle by angle, in an arbitrary order.
This could be done by first rotating in X, then Y and then in Z. Alternatively, you could first rotate in Y, then in Z and finally in X. Anything works, but depending on the order, the final orientation of the object will not necessarily be the same. Indeed, this means that there are several ways to construct an orientation from 3 different angles, depending on the order of the rotations.
Following is a visualization of rotation axes (in X, Y, Z order) in a gimbal (from Wikipedia). As you can see, the orientation of each axis depends on the rotation of the previous one:
You may be wondering how this affects you. Let's look at a practical example:
Imagine you are working on a first-person controller (e.g. an FPS game). Moving the mouse left and right controls your view angle parallel to the ground, while moving it up and down moves the player's view up and down.
In this case to achieve the desired effect, rotation must be applied first in the Y axis ("up" in this case, since Godot uses a "Y-Up" orientation), followed by rotation in the X axis.
If we were to apply rotation in the X axis first, and then in Y, the effect would be undesired:
Depending on the type of game or effect desired, the order in which you want axis rotations to be applied may differ. Therefore, applying rotations in X, Y, and Z is not enough: you also need a rotation order.
Interpolation
Another problem with using Euler angles is interpolation. Imagine you want to transition between two different camera or enemy positions (including rotations). One logical way to approach this is to interpolate the angles from one position to the next. One would expect it to look like this:
But this does not always have the expected effect when using angles:
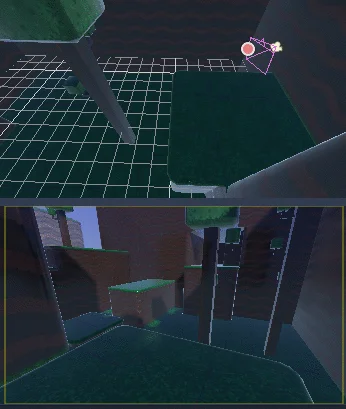
The camera actually rotated the opposite direction!
There are a few reasons this may happen:
Rotations don't map linearly to orientation, so interpolating them does not always result in the shortest path (i.e., to go from
270to0degrees is not the same as going from270to360, even though the angles are equivalent).Gimbal lock is at play (first and last rotated axis align, so a degree of freedom is lost). See Wikipedia's page on Gimbal Lock for a detailed explanation of this problem.
Say no to Euler angles
The result of all this is that you should not use the rotation property of Node3D nodes in Godot for games. It's there to be used mainly in the editor, for coherence with the 2D engine, and for simple rotations (generally just one axis, or even two in limited cases). As much as you may be tempted, don't use it.
Instead, there is a better way to solve your rotation problems.
Introducing transforms
Godot uses the Transform3D datatype for orientations. Each Node3D node contains a transform property which is relative to the parent's transform, if the parent is a Node3D-derived type.
It is also possible to access the world coordinate transform via the global_transform property.
A transform has a Basis (transform.basis sub-property), which consists of three Vector3 vectors. These are accessed via the transform.basis property and can be accessed directly by transform.basis.x, transform.basis.y, and transform.basis.z. Each vector points in the direction its axis has been rotated, so they effectively describe the node's total rotation. The scale (as long as it's uniform) can also be inferred from the length of the axes. A basis can also be interpreted as a 3x3 matrix and used as transform.basis[x][y].
A default basis (unmodified) is akin to:
var basis = Basis()
# Contains the following default values:
basis.x = Vector3(1, 0, 0) # Vector pointing along the X axis
basis.y = Vector3(0, 1, 0) # Vector pointing along the Y axis
basis.z = Vector3(0, 0, 1) # Vector pointing along the Z axis
// Due to technical limitations on structs in C# the default
// constructor will contain zero values for all fields.
var defaultBasis = new Basis();
GD.Print(defaultBasis); // prints: ((0, 0, 0), (0, 0, 0), (0, 0, 0))

// Instead we can use the Identity property.
var identityBasis = Basis.Identity;
GD.Print(identityBasis.X); // prints: (1, 0, 0)
GD.Print(identityBasis.Y); // prints: (0, 1, 0)
GD.Print(identityBasis.Z); // prints: (0, 0, 1)

// The Identity basis is equivalent to:
var basis = new Basis(Vector3.Right, Vector3.Up, Vector3.Back);
GD.Print(basis); // prints: ((1, 0, 0), (0, 1, 0), (0, 0, 1))
This is also an analog of a 3x3 identity matrix.
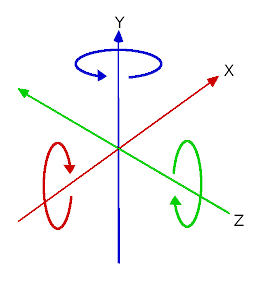
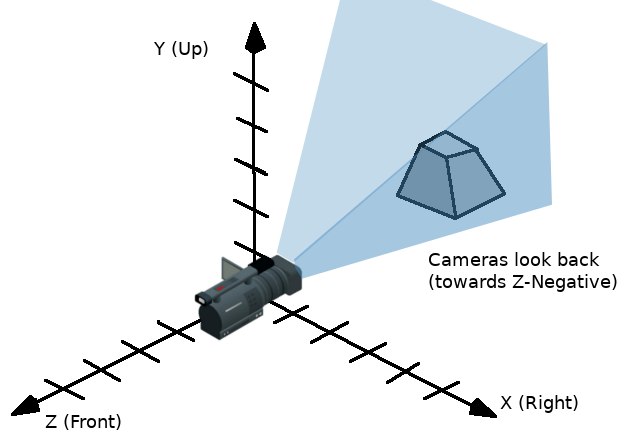
Following the OpenGL convention, X is the Right axis, Y is the Up axis and Z is the Forward axis.
Together with the basis, a transform also has an origin. This is a Vector3 specifying how far away from the actual origin (0, 0, 0) this transform is. Combining the basis with the origin, a transform efficiently represents a unique translation, rotation, and scale in space.
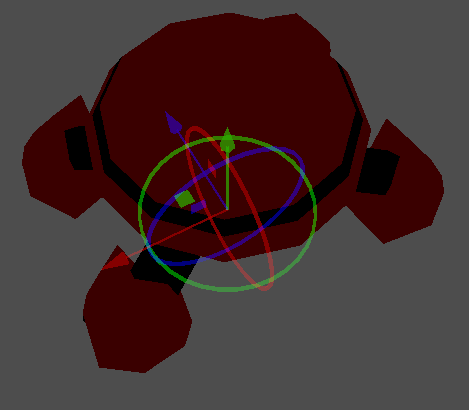
One way to visualize a transform is to look at an object's 3D gizmo while in "local space" mode.

The gizmo's arrows show the X, Y, and Z axes (in red, green, and blue respectively) of the basis, while the gizmo's center is at the object's origin.
For more information on the mathematics of vectors and transforms, please read the Vector math tutorials.
Manipulating transforms
Of course, transforms are not as straightforward to manipulate as angles and have problems of their own.
It is possible to rotate a transform, either by multiplying its basis by another (this is called accumulation), or by using the rotation methods.
var axis = Vector3(1, 0, 0) # Or Vector3.RIGHT
var rotation_amount = 0.1
# Rotate the transform around the X axis by 0.1 radians.
transform.basis = Basis(axis, rotation_amount) * transform.basis
# shortened
transform.basis = transform.basis.rotated(axis, rotation_amount)
Transform3D transform = Transform;
Vector3 axis = new Vector3(1, 0, 0); // Or Vector3.Right
float rotationAmount = 0.1f;

// Rotate the transform around the X axis by 0.1 radians.
transform.Basis = new Basis(axis, rotationAmount) * transform.Basis;
// shortened
transform.Basis = transform.Basis.Rotated(axis, rotationAmount);

Transform = transform;
A method in Node3D simplifies this:
# Rotate the transform around the X axis by 0.1 radians.
rotate(Vector3(1, 0, 0), 0.1)
# shortened
rotate_x(0.1)
// Rotate the transform around the X axis by 0.1 radians.
Rotate(new Vector3(1, 0, 0), 0.1f);
// shortened
RotateX(0.1f);
This rotates the node relative to the parent node.
To rotate relative to object space (the node's own transform), use the following:
# Rotate around the object's local X axis by 0.1 radians.
rotate_object_local(Vector3(1, 0, 0), 0.1)
// Rotate around the object's local X axis by 0.1 radians.
RotateObjectLocal(new Vector3(1, 0, 0), 0.1f);
Precision errors
Doing successive operations on transforms will result in a loss of precision due to floating-point error. This means the scale of each axis may no longer be exactly 1.0, and they may not be exactly 90 degrees from each other.
If a transform is rotated every frame, it will eventually start deforming over time. This is unavoidable.
There are two different ways to handle this. The first is to orthonormalize the transform after some time (maybe once per frame if you modify it every frame):
transform = transform.orthonormalized()
transform = transform.Orthonormalized();
This will make all axes have 1.0 length again and be 90 degrees from each other. However, any scale applied to the transform will be lost.
It is recommended you not scale nodes that are going to be manipulated; scale their children nodes instead (such as MeshInstance3D). If you absolutely must scale the node, then re-apply it at the end:
transform = transform.orthonormalized()
transform = transform.scaled(scale)
transform = transform.Orthonormalized();
transform = transform.Scaled(scale);
Obtaining information
You might be thinking at this point: "Ok, but how do I get angles from a transform?". The answer again is: you don't. You must do your best to stop thinking in angles.
Imagine you need to shoot a bullet in the direction your player is facing. Just use the forward axis (commonly Z or -Z).
bullet.transform = transform
bullet.speed = transform.basis.z * BULLET_SPEED
bullet.Transform = transform;
bullet.LinearVelocity = transform.Basis.Z * BulletSpeed;
Is the enemy looking at the player? Use the dot product for this (see the Vector math tutorial for an explanation of the dot product):
# Get the direction vector from player to enemy
var direction = enemy.transform.origin - player.transform.origin
if direction.dot(enemy.transform.basis.z) > 0:
    enemy.im_watching_you(player)
// Get the direction vector from player to enemy
Vector3 direction = enemy.Transform.Origin - player.Transform.Origin;
if (direction.Dot(enemy.Transform.Basis.Z) > 0)
{
    enemy.ImWatchingYou(player);
}
Strafe left:
# Remember that +X is right
if Input.is_action_pressed("strafe_left"):
    translate_object_local(-transform.basis.x)
// Remember that +X is right
if (Input.IsActionPressed("strafe_left"))
{
    TranslateObjectLocal(-Transform.Basis.X);
}
Jump:
# Keep in mind Y is up-axis
if Input.is_action_just_pressed("jump"):
    velocity.y = JUMP_SPEED

move_and_slide()
// Keep in mind Y is up-axis
if (Input.IsActionJustPressed("jump"))
    velocity.Y = JumpSpeed;

MoveAndSlide();
All common behaviors and logic can be done with just vectors.
Setting information
There are, of course, cases where you want to set information to a transform. Imagine a first person controller or orbiting camera. Those are definitely done using angles, because you do want the transforms to happen in a specific order.
For such cases, keep the angles and rotations outside the transform and set them every frame. Don't try to retrieve and reuse them because the transform is not meant to be used this way.
Example of looking around, FPS style:
# accumulators
var rot_x = 0
var rot_y = 0

func _input(event):
    if event is InputEventMouseMotion and event.button_mask & 1:
        # modify accumulated mouse rotation
        rot_x += event.relative.x * LOOKAROUND_SPEED
        rot_y += event.relative.y * LOOKAROUND_SPEED
        transform.basis = Basis() # reset rotation
        rotate_object_local(Vector3(0, 1, 0), rot_x) # first rotate in Y
        rotate_object_local(Vector3(1, 0, 0), rot_y) # then rotate in X
// accumulators
private float _rotationX = 0f;
private float _rotationY = 0f;

public override void _Input(InputEvent @event)
{
    if (@event is InputEventMouseMotion mouseMotion)
    {
        // modify accumulated mouse rotation
        _rotationX += mouseMotion.Relative.X * LookAroundSpeed;
        _rotationY += mouseMotion.Relative.Y * LookAroundSpeed;

        // reset rotation
        Transform3D transform = Transform;
        transform.Basis = Basis.Identity;
        Transform = transform;

        RotateObjectLocal(Vector3.Up, _rotationX); // first rotate about Y
        RotateObjectLocal(Vector3.Right, _rotationY); // then rotate about X
    }
}
As you can see, in such cases it's even simpler to keep the rotation outside, then use the transform as the final orientation.
Interpolating with quaternions
Interpolating between two transforms can efficiently be done with quaternions. More information about how quaternions work can be found in other places around the Internet. For practical use, it's enough to understand that pretty much their main use is doing a closest path interpolation. As in, if you have two rotations, a quaternion will smoothly allow interpolation between them using the closest axis.
Converting a rotation to quaternion is straightforward.
# Convert basis to quaternion, keep in mind scale is lost
var a = Quaternion(transform.basis)
var b = Quaternion(transform2.basis)
# Interpolate using spherical-linear interpolation (SLERP).
var c = a.slerp(b,0.5) # find halfway point between a and b
# Apply back
transform.basis = Basis(c)
// Convert basis to quaternion, keep in mind scale is lost
var a = transform.Basis.GetQuaternion();
var b = transform2.Basis.GetQuaternion();
// Interpolate using spherical-linear interpolation (SLERP).
var c = a.Slerp(b, 0.5f); // find halfway point between a and b
// Apply back
transform.Basis = new Basis(c);
The Quaternion type reference has more information on the datatype (it can also do transform accumulation, transform points, etc., though this is used less often). If you interpolate or apply operations to quaternions many times, keep in mind they need to be eventually normalized. Otherwise, they will also suffer from numerical precision errors.
Quaternions are useful when doing camera/path/etc. interpolations, as the result will always be correct and smooth.
Transforms are your friend
For most beginners, getting used to working with transforms can take some time. However, once you get used to them, you will appreciate their simplicity and power.
Don't hesitate to ask for help on this topic in any of Godot's online communities and, once you become confident enough, please help others!