Attention: Here be dragons
This is the latest
(unstable) version of this documentation, which may document features
not available in or compatible with released stable versions of Godot.
Checking the stable version of the documentation...
Making HTTP requests
Why use HTTP?
HTTP requests are useful to communicate with web servers and other non-Godot programs.
Compared to Godot's other networking features (like High-level multiplayer), HTTP requests have more overhead and take more time to get going, so they aren't suited for real-time communication, and aren't great to send lots of small updates as is common for multiplayer gameplay.
HTTP, however, offers interoperability with external web resources and is great at sending and receiving large amounts of data, for example to transfer files like game assets. These assets can then be loaded using runtime file loading and saving.
So HTTP may be useful for your game's login system, lobby browser, to retrieve some information from the web or to download game assets.
This tutorial assumes some familiarity with Godot and the Godot Editor. Refer to the Introduction and the Step by step tutorial, especially its Nodes and Scenes and Creating your first script pages if needed.
HTTP requests in Godot
The HTTPRequest node is the easiest way to make HTTP requests in Godot. It is backed by the more low-level HTTPClient, for which a tutorial is available here.
For this example, we will make an HTTP request to GitHub to retrieve the name of the latest Godot release.
Warning
When exporting to Android, make sure to enable the Internet permission in the Android export preset before exporting the project or using one-click deploy. Otherwise, network communication of any kind will be blocked by the Android OS.
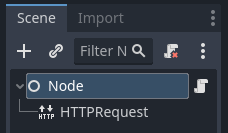
Preparing the scene
Create a new empty scene, add a root Node and add a script to it. Then add an HTTPRequest node as a child.
Scripting the request
When the project is started (so in _ready()), we're going to send an HTTP request
to Github using our HTTPRequest node,
and once the request completes, we're going to parse the returned JSON data,
look for the name field and print that to console.
extends Node

func _ready():
    $HTTPRequest.request_completed.connect(_on_request_completed)
    $HTTPRequest.request("https://api.github.com/repos/godotengine/godot/releases/latest")

func _on_request_completed(result, response_code, headers, body):
    var json = JSON.parse_string(body.get_string_from_utf8())
    print(json["name"])
using Godot;
using System.Text;

public partial class MyNode : Node
{
    public override void _Ready()
    {
        HttpRequest httpRequest = GetNode<HttpRequest>("HTTPRequest");
        httpRequest.RequestCompleted += OnRequestCompleted;
        httpRequest.Request("https://api.github.com/repos/godotengine/godot/releases/latest");
    }

    private void OnRequestCompleted(long result, long responseCode, string[] headers, byte[] body)
    {
        Godot.Collections.Dictionary json = Json.ParseString(Encoding.UTF8.GetString(body)).AsGodotDictionary();
        GD.Print(json["name"]);
    }
}
Save the script and the scene, and run the project. The name of the most recent Godot release on Github should be printed to the output log. For more information on parsing JSON, see the class references for JSON.
Note that you may want to check whether the result equals RESULT_SUCCESS
and whether a JSON parsing error occurred, see the JSON class reference and
HTTPRequest for more.
You have to wait for a request to finish before sending another one. Making multiple request at once requires you to have one node per request. A common strategy is to create and delete HTTPRequest nodes at runtime as necessary.
Sending data to the server
Until now, we have limited ourselves to requesting data from a server. But what if you need to send data to the server? Here is a common way of doing it:
var json = JSON.stringify(data_to_send)
var headers = ["Content-Type: application/json"]
$HTTPRequest.request(url, headers, HTTPClient.METHOD_POST, json)
string json = Json.Stringify(dataToSend);
string[] headers = new string[] { "Content-Type: application/json" };
HttpRequest httpRequest = GetNode<HttpRequest>("HTTPRequest");
httpRequest.Request(url, headers, HttpClient.Method.Post, json);
Setting custom HTTP headers
Of course, you can also set custom HTTP headers. These are given as a string array,
with each string containing a header in the format "header: value".
For example, to set a custom user agent (the HTTP User-Agent header) you could use the following:
$HTTPRequest.request("https://api.github.com/repos/godotengine/godot/releases/latest", ["User-Agent: YourCustomUserAgent"])
HttpRequest httpRequest = GetNode<HttpRequest>("HTTPRequest");
httpRequest.Request("https://api.github.com/repos/godotengine/godot/releases/latest", new string[] { "User-Agent: YourCustomUserAgent" });
Warning
Be aware that someone might analyse and decompile your released application and thus may gain access to any embedded authorization information like tokens, usernames or passwords. That means it is usually not a good idea to embed things such as database access credentials inside your game. Avoid providing information useful to an attacker whenever possible.