Premiers pas avec les Salles et les Portails
Le RoomManager
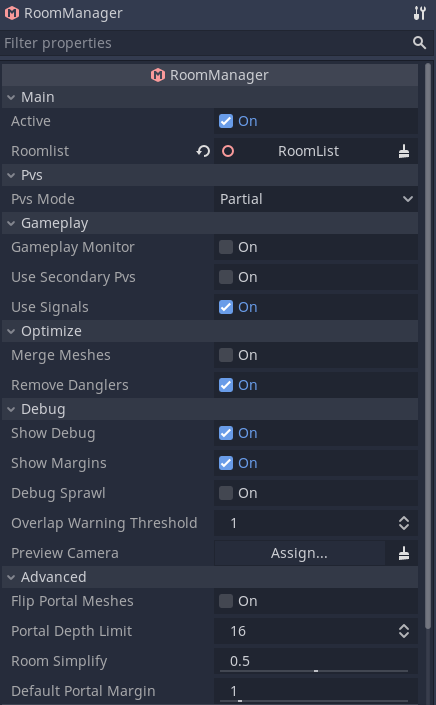
Chaque fois que vous voulez utiliser le système de portail, vous devez inclure un nœud spécial dans votre arbre de scènes, appelé le RoomManager. Le RoomManager (gestionnaire de salles) est responsable de la maintenance du système au moment de l'exécution, en particulier de la conversion des objets de vos salles en graphe de salles, qui est utilisé à l'exécution pour effectuer l'occlusion culling et d'autres tâches.
Conversion de Room
This conversion must take place every time you want to activate the system. It does not store the room graph in your project (for flexibility and to save memory). You can either trigger it by pressing the Convert Rooms button in the editor toolbar (which also has a keyboard shortcut) or by calling the rooms_convert() method in the RoomManager. The latter method will be what you use in-game. Note that for safety, best practice is to call rooms_clear() before unloading or changing levels.

If you convert the level while the editor is running, the portal culling system will take over from the normal Godot frustum culling, potentially interfering with editor features. To get around this, you can turn portal culling on and off using either the View Portal Culling toggle in the View menu on the editor toolbar (which also has a keyboard shortcut) or the Active setting in the RoomManager node.
Note
To use the RoomManager, you have to tell it where the rooms are in your scene tree, or, more specifically, where the RoomList node is. This RoomList is the parent of your rooms - see below. If the RoomList is not set, conversion will fail, and you will see a warning dialog box.
La RoomList
Before we create any rooms, we must first create a node to be the parent of all the static objects, rooms, roomgroups, and so on in our level. This node is referred to as the the RoomList.

Note
The roomlist is not a special node type – it can just be a regular Spatial.
You will need to assign the roomlist node in the RoomManager so that it knows where to find the rooms.
Why do we use a specific branch of the scene tree and not the scene root? The answer is that there are many internal details of the system which are easier to manage if the rooms are placed on their own branch.
Often you will end up completely replacing the roomlist branch at runtime in your game as you load and unload levels.
Salles
Qu'est-ce qu'une room ?
Rooms are a way of spatially partitioning your level into areas that make sense in terms of level design. Rooms often quite literally are rooms (like in a building). Ultimately though, as far as the engine is concerned, a room represents a non-overlapping convex volume in which you typically place most of your objects that fall within that area.
A room doesn't need to correspond to a literal room. It could, for example, also be a canyon in an outdoor area or a smaller part of a concave room. With a little imagination, you can use the system in almost any scenario.
Pourquoi convexe ?
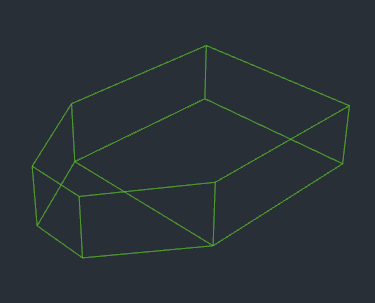
Rooms are defined as convex volumes (or convex hulls) because it's trivial to mathematically determine whether a point is within a convex hull. A simple plane check will tell you the distance of a point from a plane. If a point is behind all the planes bounding the convex hull, then by definition it is inside the room. This makes all kinds of things easier in the internals of the system, such as checking which room a camera is within.
Une enveloppe convexe. L'enveloppe est définie comme une série de plans orientés vers l'extérieur. Si un point se situe derrière tous les plans, il est à l'intérieur de l'enveloppe.
Pourquoi sans chevauchement ?
Si deux salles se chevauchent, et qu'une caméra ou un joueur est dans cette zone de chevauchement, alors il n'y a aucun moyen de savoir dans quelle salle l'objet doit se trouver (et donc être rendu), ou dans quelle salle il doit être rendu. Cette exigence de salles qui ne se chevauchent a des répercussions sur le level design.
If you accidentally create overlapping rooms, the editor will warn you when you convert the rooms, indicating any overlapping zones in red.
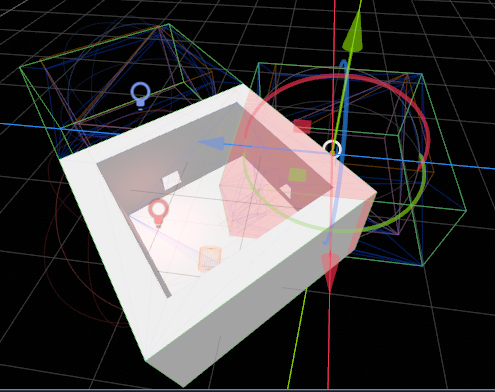
The system does attempt to cope with overlapping rooms as best as possible by making the current room "sticky". Each object remembers which room it was in during the previous frame and stays within it as long as it does not move outside the convex hull room bound. This can result in some hysteresis in these overlapping zones.
There is one exception, however, for internal rooms. You do not have to worry about these to start with.
Comment créer une room ?
Une Room est un type de nœud qui peut être ajouté à l'arbre de scènes comme n'importe quel autre. Vous pouvez placer des objets dans la salle en les faisant enfants ou petits-enfants du nœud Room.
Comment définir la forme et la position de l'enveloppe convexe de ma salle ?
Parce que la définition de la limite de la salle est l'aspect le plus important du système, il y a TROIS méthodes disponibles pour définir la forme d'une salle dans Godot :
Utiliser la géométrie des objets contenus dans la pièce pour créer automatiquement une limite approximative.
Manually edit the points that define the convex hull in the room inspector or drag the points around using the editor gizmo (see Modification des points de la salle).
Provide a manual bound. This is a MeshInstance in the room that has geometry in the shape of the desired bound, with a name with the postfix
-bound. This is something you might choose to do if you create your levels in Blender or similar (see Création de systèmes de salles dans Blender (ou un autre outil de modélisation)).
While the first option can be all that is required, particularly with simple rooms or for pre-production, using manual bounds gives you ultimate control at the expense of a small amount of editing. You can also combine the two approaches, perhaps using automatic bounds for most rooms but manually editing problem areas.
La méthode automatique est utilisée par défaut quand aucune limite manuelle n'est fournie.
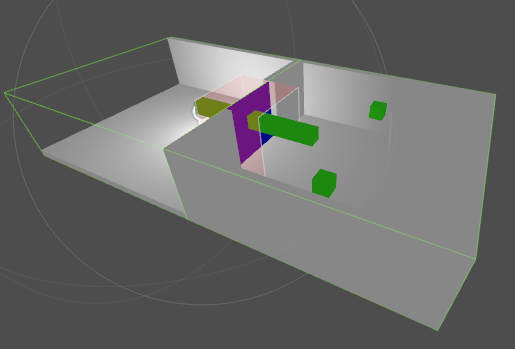
Une simple paire de pièces. La marge du portail est représentée en rouge translucide, et les bords des pièces sont représentées en fil de fer vert.
Portails
If you create some rooms, place objects within them, then convert the level in the editor, you will see the objects in the rooms appearing and showing as you move between rooms. There is one problem, however! Although you can see the objects within the room that the camera is in, you can't see to any neighbouring rooms! For that we need portals.
Portals are special convex polygons that you position over the openings between rooms in order to allow the system to see between them. You can create a portal node directly in the editor. The default portal has 4 points and behaves much like a plane MeshInstance. You can add or remove points using the inspector. A portal requires at least 3 points to work - this is because it needs to form a polygon rather than a point or line.
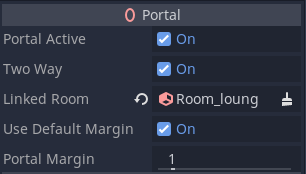
To save editing effort, only one Portal is required between each pair of Rooms. You do not need to (and indeed should not) create two Portals that overlap in opposite directions. Portals default to being two-way, but you can make them one-way in the Portal inspector.
Vous devez donc placer un portail dans une seule de chaque paire de pièces voisines - c'est la "pièce source" du portail. En général, la pièce source choisie n’a pas d’importance. La normale du portail (la flèche dans le gizmo) doit être orientée vers l'extérieur de la pièce source.
Ne soyez pas confus par la flèche. Bien que la flèche indique la direction vers laquelle le portail est orienté, la plupart des portails sont à double sens, et peuvent être vus depuis les deux directions. La flèche est plus importante pour s'assurer que le portail est lié à la bonne pièce voisine.
Liaison de Portal
Il existe deux possibilités pour spécifier la salle à laquelle le portail doit être lié :
Laissez Linked Room dans l'inspecteur vide. Le système tentera d'autolink le portail vers la pièce voisine la plus proche pendant la conversion. Cela fonctionne bien dans la plupart des cas.
Explicitly specify the room by setting the Linked Room in the inspector.
Note
Les portails sont définis comme un ensemble de points en 2D. Cela garantit que le polygone formé est dans un seul plan. La transformation détermine l'orientation du portail. Les points doivent également former un polygone convexe. Ceci est appliqué en validant les points que vous spécifiez, en ignorant ceux qui ne forment pas une forme convexe. Cela facilite l'édition tout en rendant difficile la rupture du système.
Testez-le
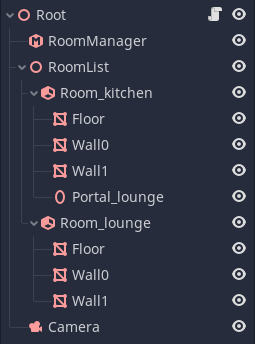
By now you should be able to create a couple of rooms, add some nodes such as MeshInstances within the rooms, and add a portal between the rooms. Try converting the rooms in the editor and see if you can now view the objects in neighbouring rooms through the portal.
Vous avez maintenant maîtrisé les principes de base du système.
L'étape suivante consiste à examiner les différents types d'objets qui peuvent être gérés par le système.